Motion photography is the bridge between photos and videos.
It’s artistic, it’s unique, and it gives you the option to make something truly fascinating.
But how do you do it?
The stock iPhone camera app has a few features, but there are other ways to take motion photographs that we’re going to cover in this guide.

- 【Kit Four Great Lense in One】: Impresionante fotografía móvil para la mayoría de los teléfonos inteligentes. Incluye 4 lentes: teleobjetivo 18x, lente ojo de pez, gran angular y macro. Todas...
- 【Fotografía mejorada】: el teleobjetivo 18x puede obtener una toma clara de sujetos que generalmente están demasiado lejos para capturarlos. También es un lente monocular con teleobjetivo con...

- Transmisión bidireccional: el lector de tarjetas SD para iPhone/iPad admite la transferencia bidireccional de tarjeta SD a iPhone o iPhone/iPad a tarjetas de memoria SD.
- Plug and Play: el lector de tarjetas SD no requiere aplicaciones de terceros, utiliza la aplicación de archivos integrada en iOS y admite la reproducción de vídeo.
iPhone motion photography is eye-catching, and once you master it, you’ll be able to create lively scenes, scene changes, and intense graphics (with a bit of post-production) from your photos.
This is how to do it.
Why do You Want to Capture Motion?
To further your artistic vision, of course.
But for real, capturing motion through iPhone Live Photos is a fun little way to add to your photography portfolio.
Think of motion capture photos as a .gif image that plays up to three seconds of a short video.
Except if you were to look at the resolution on most .gifs online, you’d see that they have like 480 x 320 and other really small, terrible, grainy resolutions.
You get to make gifs in real-time with stunning 4K clarity (or ultra wide if you’re using the iPhone 11 Pro Max).
Live photos can also be edited within your own camera roll.
Because they’re stored differently than videos, they can be edited without syncing to your PC and using video editing software.
Capturing motion is also a great tool to make unique, highly-edited and vibrant collages of your skills.
They look fantastic in online portfolios, and give you the power to edit them frame-by-frame and make everything look like a movie, only without the heavy lifting and VHX artists.
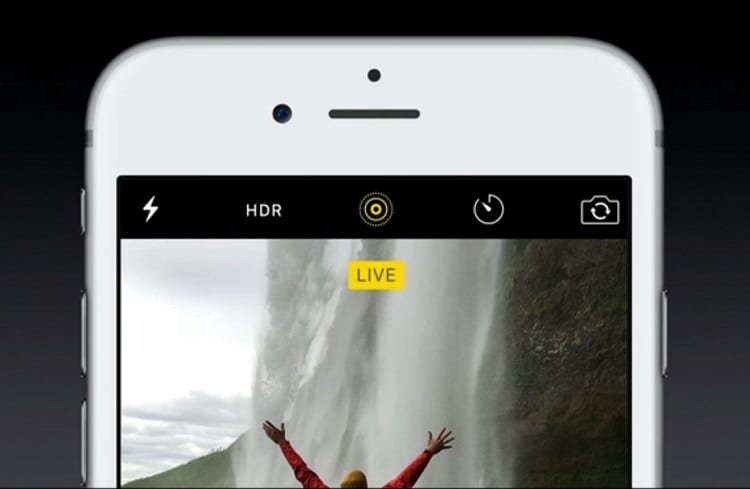
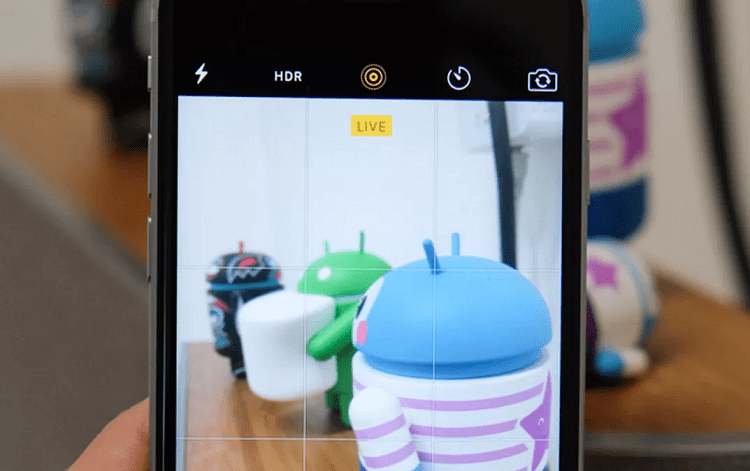
What is iPhone Live?
iPhone Live Photos take small videos, spanning 1.5 seconds before you snap a photo, and 1.5 seconds after you snap that photo.
Having this mode enabled on your phone means that there’s this constant playback of the last 1.5 seconds of wherever you focused the lens, and it’s writing it to your memory and overwriting it when you don’t lose it.
That’s why it works differently than video files.
You can take out your phone and press the shutter button quickly to try and capture a moment as it’s happening, because as we know, time is the one thing you don’t get back.
You could miss out on a golden opportunity, or you could capture it in the moment.
How to Take and Edit Live Photos
Taking photos in Live Mode is actually fairly simple.
Apple has done a fantastic job at integrating it into the stock camera app so you don’t have to enable anything crazy, or buried deep in your settings menu.
- Open your camera app and give it a second to focus.
- There will be a Live Photo button that looks yellow somewhere on your camera’s home screen. Tap on that.
- Begin taking your Live Photo.
It’s that simple to actually take a Live Photo. Editing is actually just as easy.
I’ll stay by saying that not all third-party apps, who have been upgrading along with the iPhone family over the years, are equipped to handle Live Photos yet.
It’s a tricky concept to get around in terms of coding and making editing software. For now, you can do it with the stock software on your iPhone.
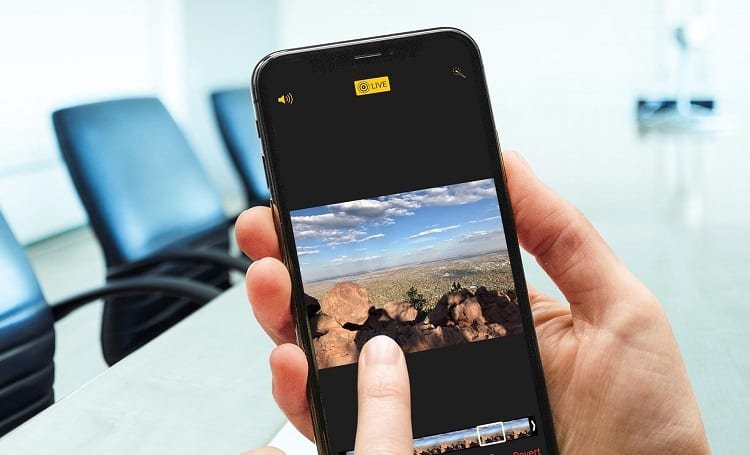
- Go to your camera roll or photos app, and find the tile where your Live Photo is.
- Tap on the live photo to open it, which should initiate autoplay. Find edit on the top of the screen and tap it.
- Now this is where the fun begins. You can trip the different photos that are included in your Live Photo, add effects, filters, and geotag all at the same time.
- Just tap done, and your Live Photos are all updated and edited.
If you’re still in the throes of taking a Live Photo, you can edit in the camera app without having to go through your photos or camera roll app separately.
Tap on the tile that shows a preview of the photo you just took, and tap on edit from that menu.
You’ll be able to see key photos in the middle of your Live Photo that you can edit right from here, and muting options will be available to you as well.
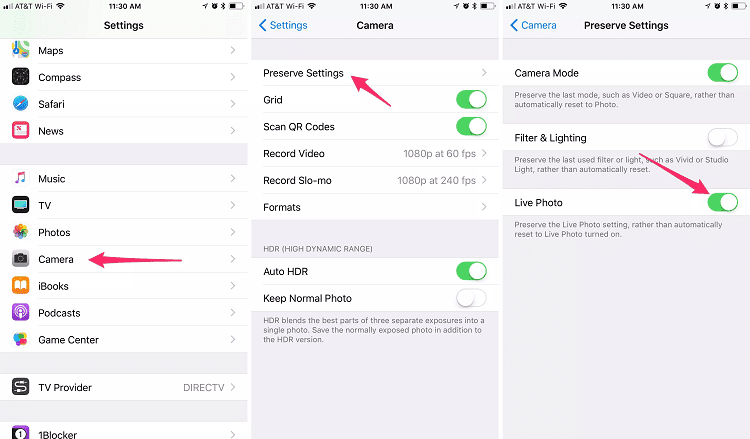
How do I Turn on Live Photos?
Live Photos can eat up a lot of storage space, but this process can also use up your ram while you’re using your phone.
That drains the battery life, makes other apps run slower, and so on.
I think it’s a really cool feature since it’s somewhere in between a picture and a video, but it’s not groundbreaking enough that I personally feel the need to leave it on at all times.
To disable Live Photos, follow these steps:
- Go to your camera app and open it up.
- Find the yellow indicator for Live Photos. It looks like a ripple effect icon.
- Tap it once to turn Live Photos off, and you’re done.
Can iPhone Edit Live Photos?
Yes, there’s actually a very intuitive way to edit Live Photos.
You can select pictures in the middle of a stretch, kind of like a game of cards—you pull one out of the middle, and either delete it or add effects to it.
One of the best features of this is that you can finalize everything, then check how the Live Photo looks, and just go back to editing if you don’t like it.
You don’t have to wait long for it to save or update the Live Photo before it’s editable again.
Since you’re going to find yourself editing five or six times in a row just to get all the little moments right, this is a huge benefit.
Tips on Getting Great Live Photos
Moving Subject
You should stay rock steady, but the subject of your photo needs to be moving around a bit to actually get the most out of Live Photos.
The best way to do this is to plan out a 5 or 6 second action, and have them perform this action a few times in a row, giving you a chance to get different Live Photos at various parts in the act.
This could be something simple like riding a bicycle, or spinning a basketball on their fingertips.
For this, you have to stay completely still and steady.
Your phone is going to take a bunch of pictures in a row, and if the frame is off slightly, you can impact the end result.
Thankfully, iPhones have the option to trim and crop multiple photos at once, so you could make a uniform size for your Live Photos if they were a bit shaky.
The only problem with this is that you’ll slightly trim down the resolution of the photos.
Use a Tripod
Keeping it together and standing still is one of the most important things you can do while taking a live photo, even if you decide to go with a moving background, which we’ll get into in just a minute.
Tripods with swivel handles allow you to maintain a steady, even frame on the image ahead of you to keep everything cohesive.
The goal is to keep the maximum resolution of your Live Photos without them looking choppy or forced.
It’s very, very tricky to pan your shots when you’re doing Live Photos.
You only have 1.5 seconds to line it up, then tap the button, and then someone keep going while panning the entire time, hoping to avoid screen shake.
It’s not exactly easy, so if you’re able to do that, kudos to you.
Try a Moving Background
Do you remember when the mannequin challenge was a thing?
People would practice standing perfectly still to the point that it looked like they were frozen in time.
If you’re taking a photo of a person, have them stand perfectly still in an environment with a busy background.
This could be the waves rolling in towards the shore behind them, or the hustle and bustle of a moving street—anything that’s going to be slightly animated for 3 seconds.
They’ll look like they were frozen in time while the world moved around them.
This concept can also be done with inanimate objects if they’re interesting enough.
You can go crazy with the possibility of a moving background, just remember that you only have a limited window to make it work.
Go With a Sharper Shutter Speed
Let’s say the subject in the middle of your photograph is a smiling woman who’s looking warmly into the lens of the camera.
They’re animated in their own right, because they’re drawing the attention of the viewer and they aren’t standing 100% perfectly still.
If your camera is already focusing on her, increase your shutter speed to zone in on that focus around her, or whoever your subject is, to give a nice effect.
This brings the focus on your subject even if they’re not very animated during the Live Photo, that way viewers will know exactly where to keep their eyes.
Blurry Vision
There’s a lot of ways to use Live Photos to your advantage, so why not get creative?
Why not take three separate pictures, blend them together, and make an ultra blurry picture that jitters all around?
It sounds crazy, and totally the opposite of everything I’ve suggested so far, but you never know where you’d be able to use it.
It’s certainly a unique way to transition a scene change.
Chrono Shot
Just saying chrono shot sounds like a DC supervillain, but it’s actually a clever way to stitch together all of your Live Photos like a panoramic, moving picture.
Let’s say you have someone running in the middle focus of the Live Photo. Your phone is on a tripod, so it’s not going anywhere.
The image is still, but the subject is moving.
You can then use chrono shot to put all the images together and overlap one another, so the only differences will be slight changes in the background, and the vastly different movements of your subject.
You can pick and choose one frame per second if you wanted, so it looked like a transition of the subject being in three different spots in the photo at the same time.
Some Closing Notes About Live Photos
Before we go, I just wanted to touch base on a few things that Live Photo mode does.
It’s a great addition, but we should be clear about every aspect of it and how it affects our iPhones during use.
Here’s the low-down.
It Eats Battery
Think about the fact that it’s constantly writing and rewriting video-ish footage whenever your camera is open.
If you’re just trying to aim and get a good shot after mounting your iPhone to a tripod for about 3-5 minutes, that’s 3-5 minutes of pre-recording (the first 1.5 seconds) that all digs into your battery life.
I don’t mean to be harsh on Apple, but we all know how quickly iPhone batteries start to die off after we get a new iPhone model.
It’s not something that I think is completely worth having on unless I’m seriously going to be using i4t that day.
It’s also a process that’s constantly running in the background and eating up ram. You can disable this in your settings for the time being if you wish.
Files Are Much Larger
Saving these mini-videos take up a lot of space on your storage.
If you didn’t go for the most maxed-out internal storage, then accounting for the OS on a 64 GB base model, you’re looking at only having about 56 GB worth of actual space.
All these photos and videos are in 4K, and those files are huge.
Saving these Live Photos can be a serious hindrance on your available storage space.
If you upgraded to the 512 GB internal storage option, this might not be a problem that even crosses your mind, but for the rest of us it could be a make or break deal.
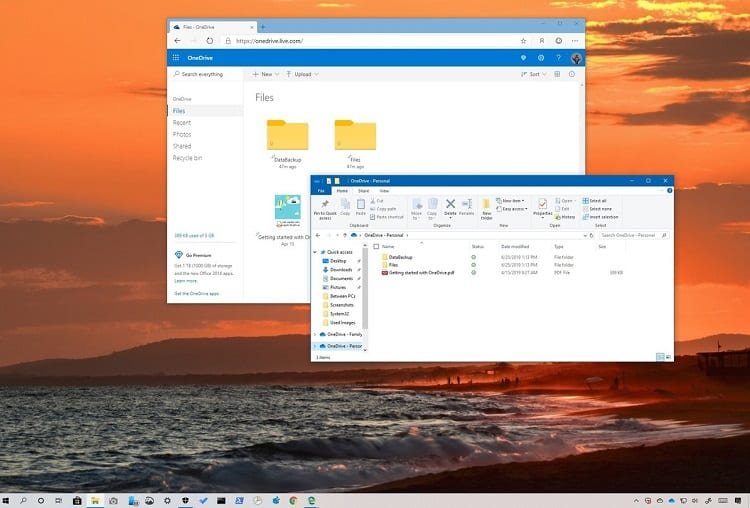
They Sometimes Don’t Sync to the iCloud
I anticipate that a fix for this is coming.
Whether it’s an iOS update or it’s just going to be in the next iPhone model, I don’t know, but I think they’ll get around to correcting this one.
When you use iCloud to backup your files, these Live Photos don’t always make it.
They’ll just stay on your phone, and you’ll have to find another way to transfer them to a Dropbox folder or form of cloud-based backup.
They’re often small enough that you can attach them to Gmail messages and just send them to your own email (if you want to avoid hooking your phone up to iTunes, that is).
There are ways around it, but it’s a pain to have to manually go into your folder and say, “Okay, did it sync my Live Photos this time?”.
You Can Set Them as Your Background
I have to say, this is pretty cool, all things considered.
It might be a little hefty on your ram, but since you’re going to be in your apps instead of just being on your home screen, it’s cool to see a subtly-moving Live Photo of a landscape and the sky that you took as your background.
It’s a nice little addition to make your iPhone really feel like it’s yours.
Are Live Photos Lower Quality?
The whole point of Live Photos is to take a rapid series of photographs at your camera’s maximum resolution, and stitch them together.
Otherwise, you would be taking a video at the max video resolution.
On the iPhone 11 Pro Max, the video res and still image res are different because of the wide angle lens.
Live Photos are not lower quality, but they can appear that way if you don’t know how to use your shutter speed correctly.
A higher shutter speed will allow you to focus on the subject, while a lower shutter speed will give the same amount of focus to everything in frame.
The latter might be a better option for those just starting out with Live Photos, or if you’re trying to make a seemingly flawless transitional photo.
Live Photos Are a Game Changer
Whether you’re using Live Photos from Apple, or you’re taking iconic motion photography through others means, they’re excellent ways to capture a little snippet of life and share it with everyone.
Think of it as taking a mini video to celebrate an event or moment.
Motion photography and live videos have their differences, but each are equally useful and can be manipulated to make some seriously unique video projects.