Nothing is more stressful than accidentally deleting a photo off of your phone, or having an update and for some reason, your most recent photos are no longer in your camera roll.
We keep everything digital nowadays, so it’s easy to get wrapped up in forgetting to create backups and what not.
This is an issue that a lot of people face, so companies took notice and have implemented solutions.
We’re going to go over how to recover deleted iPhone photos, Android photos, and different preventative methods that can create backups for you without requiring you to lift a finger.
No products found.
How to Recover Deleted Photos from Your iPhone
First, let’s glo over iPhones and see the best ways to recover photos off of them.
Thanks to the more recent iPhone versions, we’re actually seeing some of the best integrated features to take care of this without having to enlist the help of a third-party program or external software.
Use Your iPhone’s Recovery Option
After all the years of us posting on the Apple forums, I think they’ve finally listened to us.
We’re stick of losing photos, even if it’s through our own mistakes.
Now, Apple has put a little handy piece of software into iOS that enables a thirty-day recovery window.
Instead of losing your photos from accidental deletion, they’re just going to sit in the background. Here’s how it works:
- If you’ve deleted photos by mistake, you can go to your camera app to recover them. Tap on your most recent photo, or go to your camera roll without going through the camera app. Whatever works for you.
- Go to your albums and tap on on an individual folder. You have to do this on a per-folder basis, so if you’re someone who uses a lot of folders, theni this might be a chore for you.
- When you tap on the three dots at the edge of your menu on the album, you’ll see an option titled “Recently Deleted.” Tap on that.
- There, you’re going to find a little trove of your photos that have been accidentally deleted by you in the last thirty days. You’re also going to find photos that you intentionally deleted, so you have to dive through a sea of failed selfies to get the pictures that you want.
Keep in mind that this feature needs to be enabled before it will work.
When you’re going through the setup of a new iPhone, this is usually included in the automatic setup portion, but it’s still important to check if this is on beforehand.
You have thirty days. As of right now, there’s no cap on the number of photos that this folder will hold onto for you.
If you’re running low on memory at any point, you can go here and delete these photos to free up a bit of space in the future.
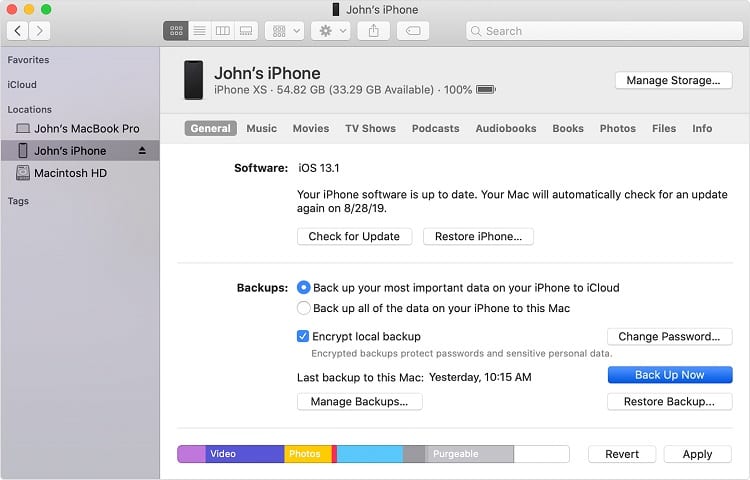
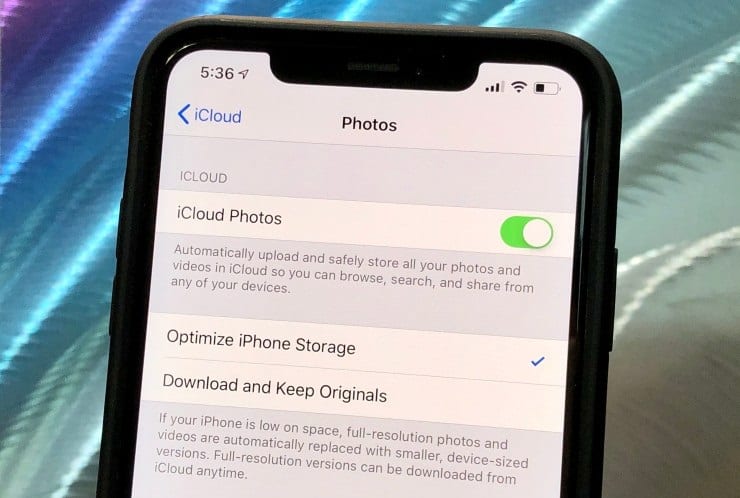
iCloud Backup
This addition to Apple’s lineup of apps can be aggravating when it needs to update, but it’s also a lifesaver half the time.
Your iCloud service comes free with your iPhone, up to the first 5GB. After that, pricing plans can be purchased.
If you take a lot of photos, like professional-grade photographs and save them in raw files, you’re going to eat up this 5GB really fast. Thankfully, the plans aren’t too expensive.
- Start by connecting your phone to Wi-Fi. The last thing you want is the data bill from this.
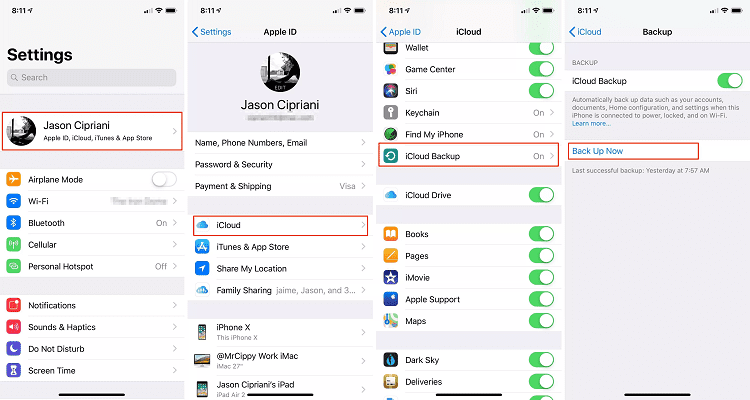
- Go into your settings where your Apple ID is located. Underneath your name, you’re going to see a setting for the iCloud. It’s integrated into all new iPhones.
- Go into that setting that slide the iCloud Backup option over to green, and then tap the back button. You want to keep your phone on and connected to the Wi-Fi so it can actively backup everything on your iPhone of relevance.
- Everything will transmit and finish, but if you’re not keen on doing this on a daily basis, or you want even more protection against losing your photos, you can enable automatic backups.
- With your iCloud backup enabled, go into your iTunes or iCloud to access your files.
These plans jump up quite a bit on a monthly plan.
You ready?
From 5GB (free) up to 50GB, you now have to pay $0.99 per month.
Crazy, right?
The maximum plan is 2TB for $9.99 per month, so even if you end up needing that much, it’s still not a whole lot per month
iTunes Backup
This one is a bit tricky, because as we all know, iTunes is glitched out to kingdom come.
It’s just not the best software, so you have to follow all of these steps to ensure that by restoring your photos, you won’t end up deleting notes, settings and contacts in the process.
It can and has happened.
- Make your own backup without the use of an automatic feature. I recommend going through your current photos, contacts, music and everything on your phone that you do not want to lose, and putting them all in Dropbox folders. You can also find competitive services that are cheaper than Dropbox with higher GB limits on free memberships.
- If you have kept your iCloud storage option on, then you’re in luck (that Dropbox folder is for safekeeping and to protect against this possibly not working). You can go into your settings, then to your Apple ID, then your iCloud. Here, you will be able to see the file size of your backup.
- Knowing that you have a backup through Dropbox or a different service, go ahead and tap on the anxiety-inducing option “Erase All Content and Settings.”
- Restart your device. You don’t have to power down, a simple restart will do the trick. When you’re here, go into Apps and Data, and you’ll see an option to Restore from iCloud Backup. Tap on that.
- Select the automatic backups that iCloud has been creating for you all along. You can select a backup dat before you deleted your photos. Remember that Dropbox folder? That’s going to have your new photos and contacts in it, so you won’t actually lose them just because you select a different backup folder.
- Initiate that backup, and check your camera roll. You should see all of your older photos. I recommend putting them in that backup Dropbox folder before you carry on.
- As a precaution, just go back into your settings and make sure that iCloud backup is still on. Sometimes this can get flicked off by accident when we’re going through all of the other settings. If you should need to do this again, you want the option to be available to you.
This is like the time-bomb of recovery methods. It can work well, even if it’s slow, but it has a lot of pitfalls that you have to be aware of. Tread lightly.
How to Recover Deleted Photos from Your Android Phone
Cloud Backup Method
The good thing about Android phones is that since they’re all manufactured by different brands and companies, they’re able to run the same programs (otherwise the software wouldn’t be good, now would it?).
This means that a lot of the services that you use on Android come straight from Google.
You’re not relying on, say, Alcatel to run your cloud storage.
Utilizing the cloud from the moment you turn your new phone on is going to be a major lifesaver here.
- Sign up with a cloud service that you feel comfortable with. Since a lot of Microsoft apps are free to use on Android phones, you can use OneDrive, or you can use Google Photos. Whatever it is that you feel more comfortable with, or a service that you can get more free storage with.
- When you’re signed up with one of these services, in their respective app, they will instruct you how to engage safe backups. This is going to require that you plug your phone in during the first mass copying and transmitting of your files. You can select what you want to save, and then poof—it’s in one of these services.
- Keeping your settings enabled to continuously provide updates to your backups is important. This ensures that you’re actually saving your files one by one. If this is enabled and you accidentally delete a photo, then it’s time to hit the next step.
- You’ve accidentally deleted your photo. Google Photos, OneDrive, and Dropbox (the three most popular choices) all have settings enabled to help you with this. Plenty of people have deleted photos by accident, especially when trying to organize them into other folders within their phone. Go into your respective service, and find the trash bin. Here, photos will be kept for up to 30 days for some services, up to 60 for others.
- Click on the items in the trash bin and hit restore. Depending on the service, you’re going to receive options such as “Sync Old Files to [Device Name]?) and things of that sort. This will send the picture right back onto your phone.
- Last but not least, before you log out of your cloud service, make sure that all backups are current and that all of your settings are still enabled in case this should happen again.
Now that you’ve got your photos back, it’s recommended to make a backup on Dropbox or your PC/laptop desktop.
Simply copy and paste all the files you were afraid to lose into here, and do this regularly just to be on the safe side.
While cloud backups are generally easy, there are plenty of horror stories online about when they fail.
It’s a lot of data to transmit at once, so use them cautiously to avoid any mistakes.
Restoring SD Cards
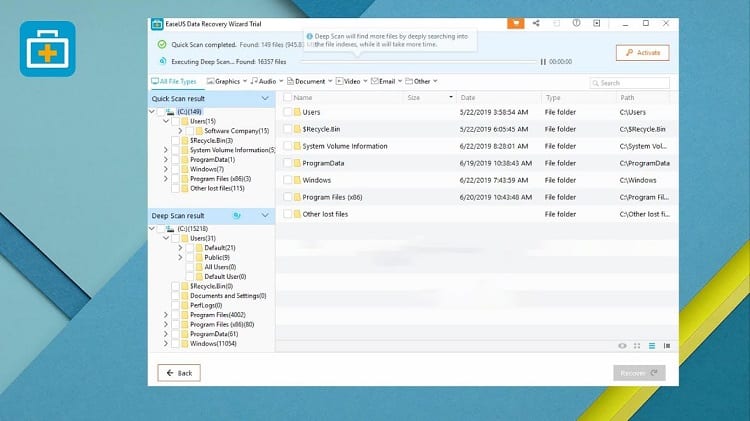
Many Android phones don’t come with a lot of internal memory.
Instead, they sell you on SD cards and MicroSD cards, which you can slide into respective ports on the side of your device.
It makes it easy to just remove them when you need to and plug them into an adapter.
- Remove your SD or MicroSD card from your phone and insert it into the appropriate adapter for your laptop or PC.
- Find a third-party program that specifically runs data recovery. Personally, I use EaseUS Data Recovery Wizard, but there are tons of reputable programs out there (some of which you have to pay for) that can get the job done.
- Run your data recovery program once your card is plugged into your PC. Depending on what program you chose and if you’re using a paid or free version of it, you might have to do this in batches of 1GB to 2GB at a time. It’s a gimmick to get you to buy the full version, but as long as you haven’t filled up a 128GB MicroSD card, I see no reason why you should pay for a program that you may only use once or twice.
- You’ll be shown a list of files in a tile-based format. You may either select them individually with checkboxes, or just click on Select All to restore everything at once. This will pull everything that has been deleted off of the memory card all at once, so be sure to have a destination folder ready.
- Return your card to your phone. Keep those restored files on your PC or laptop for safe keeping.
If you want, you can keep that SD/MicroSD card in a secure location since it has all your backups on it, and get a new card to put into your phone.
They’re relatively cheap, and it ensures you have a hard copy of that specific series of backups so that you don’t end up doing this again.
Reviving a Rooted Phone
If we didn’t have Samsung for Android phones, they would be beneath iPhones all the way.
Thankfully, Samsung has raised the class average, so to speak, when it comes to Android phones.
Back in the day, users would root their phones to make them more appealing, run more applications, and fix technical software issues. Plenty of people still do it today.
- Manually backup all of your photos, contacts, app data, and anything else that you need before you attempt this. While I have a slightly low-risk solution for you, it’s always good to be prepared in case things go south.
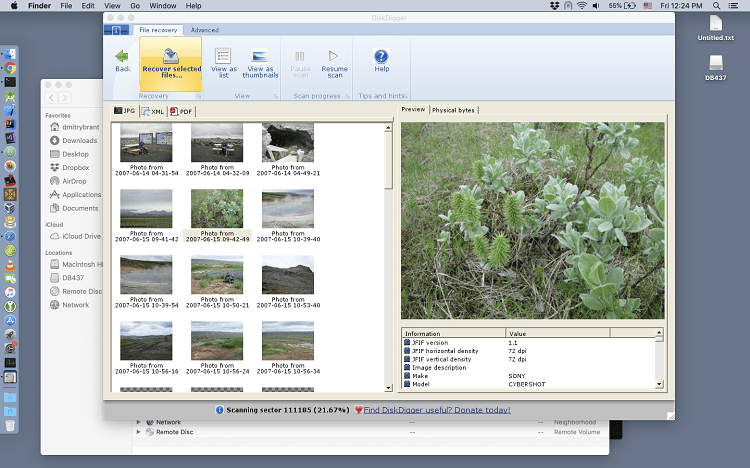
- There is a near-magic solution here. Instead of manually rooting your phone yourself and risking damage to the OS, you can download one of the greatest apps to ever exist, DiskDigger.
- When you run DiskDigger, it’s going to ask permission, just like any other app would. But it’s going to be asking for permission to root your phone. Now I have to say, they make it a streamlined process with a very low risk method, but anything is possible. Give DiskDigger permission to root your phone.
- Once you’re actually in the app, you’ll get two options, which are basic scan, and full scan. Go to full scan and allow DiskDigger to look through every file on your phone, which will include deleted ones that are still lingering around.
- If you’re like me and have a lot of items on your phone, you can simply use a filter in the settings menu to exclude app extensions, contact files, and things like that. We don’t need 1-3 years of contact names popping up when you deleted them for a reason, you know?
- Find the photos that you want. You’ll be shown a list or set of preview tiles for those files. Tap an individual file, and then find the recover button on the top right of the screen.
- Repeat step 6 as many times as necessary, for as many files as you want. Just remember that some files may be found, but corrupted, and therefore not redeemable. It’s on a per-file basis.
If you’ve already been using a rooted phone, then this should work with a rough 99% accuracy rating.
If your phone isn’t rooted and you’re going to root it to try this method, be careful: your files could be permanently lost if you don’t approach this with cautious.
There’s Always a Way
Just because you can’t find it doesn’t mean it’s lost.
While not every iPhone photo can be retrieved, most can, and the same goes for Android. You just have to know where to look.
Sync items to a cloud service and back them up regularly either with helpful apps, or doing it manually.
In this digital era, it’s so easy to lose important files in the blink of an eye: protect yourself, and your phone.